Java ESC/POS Image Printing
Hi! I've been wanting to do this post for a while. For many years I've been working from time to time with various printing issues, mainly in the context of Kiosk/Receipt printing.
The most common printer that I've used was an Epson Thermal Printer, such as the TM-T88III or more recently TM-T88V (which my article will treat).

The m parameter specifies the dot density, and can have only 4 possible values m = 0, 1, 3, 33.

I'll repeat it one more time, this parameters need to be set properly and can vary from image to image. Do this or your printer will lock or print gibberish.
Other important concept to grasp is that the printer will print the image in stripes of the selected dot density. Let's say that you image is of 73x48 pixels and you choose m = 33 (24-dot density), the your image would be printed in two stripes of 73x24. An explanation of why the previous parameters of the actual image data are important is that once you feed all the pixel information the printer will resume to normal text printing mode, so if you put for example m = 0 (8-dot density), nL = 0x05 and nH = 0x0, then you must provide an array of 5 bytes (8 bits x 5 dots wide, bit density chosen x width of the image).
Understanding how the image is printed


The most common printer that I've used was an Epson Thermal Printer, such as the TM-T88III or more recently TM-T88V (which my article will treat).
One of the various requirements from my clients had been putting their logo on their receipts, and although you can upload the logo to the printer with a tool and tell the printer to print logo #1; this way can be very rigid and hard to maintain (changing the logo would require for me to go printer by printer uploading the new logo).
A better way is to raster the image pixel by pixel using ESC/POS, the native command language of the printer. Being a thermal printer, there is no concept of color, nor gray scale; either the pixel is burned or not burned, black or white. This is a very important concept to have in mind.
ESC/POS is Epson's proprietary set of commands for their printers, luckily there are some other manufacturers that comply with all or some commands so you can easily port it. Note however that some other manufacturers don't support it or have their own set of commands (like Zebra), but I think that the command operation won't differ much.
Understanding the command
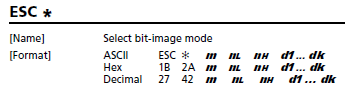
Reading the documentation you'll find the following command:
Hardly the name of the command does it any honor to what is really done, but we'll settle with that. The first thing that pops up is that the command it has a constant and variable (or parametric) part , 1B 2A begin the constant part and m nL nH d1...dk being the variable part. A bit of a recommendation, don't send to the printer and/or don't use to the ASCII notation or format, stick with the Hex notation (or with the decimal notation). The ASCII notation can get confusing when you start mixing letters with bytes (in the end they are all bytes), also I prefer to have static final byte[] as a constant with the constant part of the command, like:
private final static char ESC_CHAR = 0x1B;
private final static char GS = 0x1D;
private final static byte[] LINE_FEED = new byte[]{0x0A};
private final static byte[] CUT_PAPER = new byte[]{GS, 0x56, 0x00};
private final static byte[] INIT_PRINTER = new byte[]{ESC_CHAR, 0x40};
private static byte[] SELECT_BIT_IMAGE_MODE = {0x1B, 0x2A, 33};
private final static byte[] SET_LINE_SPACE_24 = new byte[]{ESC_CHAR, 0x33, 24};
The two first numbers (0x1B and 0x2A) are the command code, the following are parameters, neither of them must be left to chance. You must know exactly what to send in this parameters, otherwise the printer would not know what to do, will get blocked or print gibberish.
The m parameter specifies the dot density, and can have only 4 possible values m = 0, 1, 3, 33.
What this really means translated to english is the number of bytes we'll send at a time representing the image, I'll explain it latter with an example.
The nL and nH parameters represents the width of the image in pixels. nL is the low byte and nH is the high byte. Let's say that you want to print an image of 73 pixels, then the parameters would be nL = 0x49 and nH = 0. Or if the image is 300 pixels wide, nL = 0x2C and nH = 0x01.
I'll repeat it one more time, this parameters need to be set properly and can vary from image to image. Do this or your printer will lock or print gibberish.
Other important concept to grasp is that the printer will print the image in stripes of the selected dot density. Let's say that you image is of 73x48 pixels and you choose m = 33 (24-dot density), the your image would be printed in two stripes of 73x24. An explanation of why the previous parameters of the actual image data are important is that once you feed all the pixel information the printer will resume to normal text printing mode, so if you put for example m = 0 (8-dot density), nL = 0x05 and nH = 0x0, then you must provide an array of 5 bytes (8 bits x 5 dots wide, bit density chosen x width of the image).
Understanding how the image is printed
If you've done any amount of rendering programming you know that you raster the image on the screen in scan lines left to right, top to bottom. But with this printers, the rasterization is done top to bottom, left to right. Is important to have this in mind when sending the image data. This have to do with how the thermal printer head prints the data.
If we've a image of 8 pixels high and w pixels wide the data will be sent:
In this example, we get the image in an array of pixels in the following order [px0, px1, ..., pxw, ..., px8w], but the "same" data must be sent the printer in another order: [d0, d1, d2, ..., d k].
Like I said before, there is no concept of color in thermal printing, either the pixel is burn or is not. So each pixel will be a bit not the color itself, and we'll be sending multiple pixels per byte.
Understanding how the image is printed
Let's start with some warm up exercises:
Send the printer [0x1B, 0x2A, 0x0, 0x5, 0x0, 128, 64, 32, 16, 8] (I changed from hex to decimal for clarity).
You should see a descending line of 5 dots. Let's explain what have we done here, we've selected the 8-bit density mode, and the width of the image is 5px (all in hex). The following decimals are the px data sent:
You can add 3 more dots to the line, I left to you as an exercise to complete the line, but remember you'll need to change the nL parameter.
Now let's get to real stuff, let's get the pixels of an image:
BufferedImage bi = (BufferedImage) image.getImage();
int[][] pixels = getPixelsSlow(bi);

...
// The performance of this method
// is rather poor, place for improvement
private int[][] getPixelsSlow(BufferedImage image) {
    int width = image.getWidth();
    int height = image.getHeight();
    int[][] result = new int[height][width];
    for (int row = 0; row < height; row++) {
        for (int col = 0; col < width; col++) {
            result[row][col] = image.getRGB(col, row);
        }
    }

    return result;
}
Actually printing the image
Once you have the image in an array of pixels, let's print them:
private void printImage(int[][] pixels) {
 // Set the line spacing at 24 (we'll print 24 dots high)
 printPort.writeBytes(SET_LINE_SPACE_24);
 for (int y = 0; y < pixels.length; y += 24) {
  // Like I said before, when done sending data,
  // the printer will resume to normal text printing
  printPort.writeBytes(SELECT_BIT_IMAGE_MODE);
  // Set nL and nH based on the width of the image
  printPort.writeBytes(new byte[]{(byte)(0x00ff & pixels[y].length)
                             , (byte)((0xff00 & pixels[y].length) >> 8)});
  for (int x = 0; x < pixels[y].length; x++) {
   // for each stripe, recollect 3 bytes (3 bytes = 24 bits)
   printPort.writeBytes(recollectSlice(y, x, pixels));
  }

  // Do a line feed, if not the printing will resume on the same line
  printPort.writeBytes(PrinterCommands.FEED_LINE);
 }
 printPort.writeBytes(SET_LINE_SPACE_30);
}

private byte[] recollectSlice(int y, int x, int[][] img) {
    byte[] slices = new byte[] {0, 0, 0};
    for (int yy = y, i = 0; yy < y + 24 && i < 3; yy += 8, i++) {
        byte slice = 0;
 for (int b = 0; b < 8; b++) {
            int yyy = yy + b;
     if (yyy >= img.length) {
         continue;
     }
     int col = img[yyy][x];
     boolean v = shouldPrintColor(col);
     slice |= (byte) ((v ? 1 : 0) << (7 - b));
 }
        slices[i] = slice;
    }

    return slices;
}

private boolean shouldPrintColor(int col) {
    final int threshold = 127;
    int a, r, g, b, luminance;
    a = (col >> 24) & 0xff;
    if (a != 0xff) {// Ignore transparencies
        return false;
    }
    r = (col >> 16) & 0xff;
    g = (col >> 8) & 0xff;
    b = col & 0xff;

    luminance = (int) (0.299 * r + 0.587 * g + 0.114 * b);

    return luminance < threshold;
}
If you've done everything right you should see the image printed, if not check the steps again:
Interfacing
In the code that I've used the interfacing can take place with a serial port or with an USB port. For this purpose I been using this two great libraries:
If you can, try to support this guys you can't imagine the great deal of pain that you're saving yourself.
Side notes
I know there still room for improvement, some parts of the code are not production ready. For example you could cache the bitwise representation of the image.
If you want to ask me some question feel free to send me an email.
Source code
All this knowledge was derived from my previous job. I was tasked to develop a printing service/daemon that would print tickets remotely (on a Kiosk, where a server would issue priting requests).
I removed all the project related code to avoid legal issues, and I'm attaching the server part of the code (not the client, although you don't need it for this).
You can pack this project in a JAR file and use the Main class to test it right away, all the needed libraries are bundled.
Small source explanation:
Let me explain a little bit about the classes that are inside the project.
TicketPrinterJob: This class represents an abstraction of a print job. Contains a list "lines", what this means is that the job is printed in a plain text fashion, line after line (whether is text or image).
TicketPrinterJobLine: Abstraction about the line to be printed. This class is inherited by TicketPrinterJobText and TicketPrinterJobImage, that would print a line of text or an image respectively.
EscPosStrategy: This class gets the job done, it send the proper ESC/POS commands and data bytes to the printer. Has a print public method that accepts a print job.
For the moment I don't have access to a ESC/POS printer so this code isn't properly tested. Please contact me if you have any problems.
References
Edit #1: I revisit and reworked some parts of the article to enhance comprehension and clarity.
Edit #2 (2015/03/31): Thanks to Daniel Bernard for pointing out that the source code didn't worked. Attaching proper files.

Great tutorial....
ReplyDeleteThank you so much! your post really helped me on how to solve it I ported it to objective c if you want I can share the code with you and do an update so you have both java and objective-c
ReplyDeleteHi,
Deletei'm going to do same code!
Can you give me an example code in objective-c? Thank's in advance!
I have this exception! Caused by: javax.usb.UsbException: Properties file javax.usb.properties not found. What Can I do?
ReplyDeleteyou should create javax.usb.properties file and have it included in your class path
DeleteThere are white lines in the printed image. You have any idea to remove it ?
ReplyDeletesame problem here. Please help.
DeleteYeah I had a similar problem. That's probably an issue of the image, have you tried different images?
DeleteIf isn't image related, I would recommend that you check the code and check if you're missing one row (since you should print several rows at the same time) or if you're setting the line spacing or the pixel density wrong.
Thanks for making the code available. Re the white lines - this Stackoverflow question might be the answer: http://stackoverflow.com/questions/21192888/how-print-bit-image-tm-t88v
DeleteThanks for your input @bryan, yes as I said before probably is an issue of the dot density:
Delete// Set the line spacing at 24 (we'll print 24 dots high)
printPort.writeBytes(SET_LINE_SPACE_24)
Or maybe the last pixel row is not being set in the data.
Hope the code is of any use, isn't properly tested as I no longer have a printer to test it on.
Hi Gustavo - I couldn't solve the white space issue using bit-image printing, but it does work using the NV image printing escape codes. For anyone interested, you can download the code from:
ReplyDeletehttp://servermule.webbtide.com/escpos.html
This comment has been removed by the author.
DeleteHi Bryan
DeleteIve got the same issue with the white lines in Bit images. Are you able to post your same for NV images please? The link here isnt working. Thanks
Hello Gustavo.
ReplyDeleteYour post have helped me. I printed a image (64x64) with successful.
But the quality is exceptionally great and slow consequently.
I want to print quickly and I don't care about quality.
I tryed set the m parameter of SELECT_BIT_IMAGE_MODE command, but I failed.
By the way
Can you imagine what I'm doing wrong?
Congratulations for your blog.
Hi Felipe, let me see if I got it. You're telling me that the printing process is really slow, but is the printer slow? or only the code ran before sending the printing job?
DeleteIf the printer is slow I would say that you can't do nothing about it, since same amount of point will be burned (that's mechanical)
If the code is slow, maybe the image is too big (in let's say DPI) and you need to reduce the image quality.
I would test this against some hardcoded image, let's say you 64x64 img, if that's been printed fast then the imported image is the problem.
Thanks for the answer.
DeleteThe document that I am printing is a report with an image in the header and text content.
The delay in printing is only with the image. The rest of the printing is fast.
I thought to decrease the resolution. I'll test it and then I answer you.
The change did not work. The image resolution does not change the time of printing.
DeleteAnd there is no option to change the speed of printing.
I do not know what to do. Any other ideas?
This comment has been removed by the author.
ReplyDeleteGood Morning
ReplyDeleteThanks, your article helped me, very good, the only thing I do not understand is why I have to install the printer drivers with zadig.akeo.ie? , Natively does not detect them from java, does not work.
Good evening, now I'm trying to test on another computer and I get the following error
ReplyDelete2016-12-12 22:49:18,153 [AWT-EventQueue-0] ERROR [com.puntopos.devices.DevicesConfiguration] - Error al cargar los dispositivos usb pos
org.usb4java.LoaderException: Native library not found in classpath: /org/usb4java/windows-x86/libusb-1.0.dll
at org.usb4java.Loader.extractLibrary(Loader.java:281)
at org.usb4java.Loader.load(Loader.java:356)
at org.usb4java.javax.Services.(Services.java:59)
at sun.reflect.NativeConstructorAccessorImpl.newInstance0(Native Method)
at sun.reflect.NativeConstructorAccessorImpl.newInstance(Unknown Source)
Hi Jonathan,
DeleteI'm guessing that you're trying to use an USB printer, since the interaction is made with usb4java, which uses libusb, you need to provide the dll (compiled library).
As you're instructed, you can add it to the classpath (think this is a valid example http://wiki.netbeans.org/SlickSet). Otherwise also should be possible to add the DLL in
- (x86): /system32
- (x64): /syswow64
(If you're using Linux, should be made available in "/local/lib" I think).
Regarding the USB driver I'm not sure if it mandatory, it shouldn't since you are sending POS commands to the printer directly, but I might be mistaken.
Thank you for this article! Really helpful.
ReplyDeleteAnd you for your comment :)
DeleteGlad you found it useful.
Thanks for the brilliant tutorial.
ReplyDeleteI use it in android, and my problem that, the Android SDK doesn't have BufferedImage class. So the following method
private int[][] getPixelsSlow(BufferedImage image) {
int width = image.getWidth();
int height = image.getHeight();
int[][] result = new int[height][width];
for (int row = 0; row < height; row++) {
for (int col = 0; col < width; col++) {
result[row][col] = image.getRGB(col, row);
}
}
return result;
}
was replaced by the next methods in Android.
private int[][] getPixelsSlow(Bitmap image) {
int width = image.getWidth();
int height = image.getHeight();
int[][] result = new int[height][width];
for (int row = 0; row < height; row++) {
for (int col = 0; col < width; col++) {
result[row][col] = getRGB(image, col, row);
}
}
return result;
}
private int getRGB(Bitmap bmpOriginal, int col, int row) {
// get one pixel color
int pixel = bmpOriginal.getPixel(col, row);
// retrieve color of all channels
int R = Color.red(pixel);
int G = Color.green(pixel);
int B = Color.blue(pixel);
return Color.rgb(R, G, B);
}
I hope, this will help orther persons that will face the same problem.
Thanks again, you save me.
Bro! you saved me hours of pain!!
DeleteHello, My kotlin version for Android. I had to add a delay after each line or I got strange results. Probably the printer does not process the line on time and therefore I had to add a delay (personally I try to avoid this but no other solution)
Deletefun printImage(bitmap: Bitmap?){
if(bitmap != null){
val pixels = getPixelsSlow(bitmap)
printImage(pixels, bitmap.width, bitmap.height)
}
}
fun printImage(pixels: Array,width: Int,height: Int) {
// Set the line spacing at 24 (we'll print 24 dots high)
_outputStream.write(SET_LINE_SPACE_24)
// var y = 0
for(y in pixels.indices step 24){
// while (y < pixels.size) {
// Like I said before, when done sending data,
// the printer will resume to normal text printing
_outputStream.write(selectBitImageMode)
// Set nL and nH based on the width of the image
_outputStream.write(
byteArrayOf(
(0x00ff and pixels[y].size).toByte(),
(0xff00 and pixels[y].size shr 8).toByte()
)
)
for (x in 0 until pixels[y].size)
{
// for each stripe, recollect 3 bytes (3 bytes = 24 bits)
val colectedBytes = recollectSlice(y, x, pixels)
_outputStream.write(colectedBytes)
// Log.d("QR","y: $y x: $x Values: ${colectedBytes.toString()}")
}
_outputStream.write(escPosLFCode)
// _outputStream.flush()
Thread.sleep(200)
}
_outputStream.write(SET_LINE_SPACE_30)
}
private fun recollectSlice(y: Int, x: Int, img: Array): ByteArray? {
val slices = byteArrayOf(0, 0, 0)
var yy = y
var i = 0
while (yy < y + 24 && i < 3) {
var slice: Byte = 0
for (b in 0..7) {
val yyy = yy + b
if (yyy >= img.size) {
continue
}
val col = img[yyy][x]
val v = shouldPrintColor(col)
slice = (slice.toInt() or ((if (v) 1 else 0) shl 7 - b).toByte().toInt()).toByte()
}
slices[i] = slice
yy += 8
i++
}
return slices
}
private fun shouldPrintColor(col: Int): Boolean {
val threshold = 127
val a: Int
val r: Int
val g: Int
val b: Int
val luminance: Int
a = col shr 24 and 0xff
if (a != 0xff) { // Ignore transparencies
return false
}
r = col shr 16 and 0xff
g = col shr 8 and 0xff
b = col and 0xff
luminance = (0.299 * r + 0.587 * g + 0.114 * b).toInt()
return luminance < threshold
}
fun getPixelsSlow(image: Bitmap): Array {
val width = image.width
val height = image.height
val result = Array(height) { IntArray(width) }
for (row in 0 until height) {
for (col in 0 until width) {
result[row][col] = getRGB(image, col, row)
}
}
return result
}
private fun getRGB(bmpOriginal: Bitmap, col: Int, row: Int): Int {
// get one pixel color
val pixel = bmpOriginal.getPixel(col, row)
// retrieve color of all channels
val R: Int = Color.red(pixel)
val G: Int = Color.green(pixel)
val B: Int = Color.blue(pixel)
return Color.rgb(R, G, B)
}
Good evening, thank you very much, this article is very useful, another question that works has the library Citizen_Android_105d.jar, has some example for android which can share
ReplyDeleteThank you
Oh man , you just deleted my comment :(
ReplyDeleteThe conversation wasn't productive, I asked to provide more feedback on the issue, but you only insisted in that the code was buggy without providing proof or solution. Hope you understand.
DeleteThis blog post is been here for almost 3 years and you are the first that mention a problem with the code, although the post is not about perfect working code but to teach and understand how to print bitmap on a thermal printer.
Note aside, I don't like deleting comments (this is the first comment I delete) as I consider it a kind of censorship, but for the reasons stated above I decided that the best for the post and the people reading it.
DeleteSo they don't get confused with "The code is buggy, doesn't print 100x100". But you don't provide proof of that or solution if that's actually the case.
Sorry, ok I was using the printer bixolon SPR200 is a bluetooth printer, I made an Android application and using your code works fine on images below 100x100,, after that the image can´t be printed, only appears the first 5 o 6 lineas of the image.
DeleteDoes your code works on any image or have some restrictions?
Thanks
Hey man, thanks for the post, it helped me a lot. I know it's been a long time, but I want to know if you can help me.
ReplyDeleteI ported your code to Android https://git.io/vHW3M and it worked great for an MTP-II bluetooth printer https://goo.gl/SzfNqX
With the MTP-II I can print images of 380x380, is great!
But it does not work for the NP100 https://goo.gl/iOyRRh
The NP100 only prints Chinese characters :(
Before your code, I was using this one https://github.com/imrankst1221/Thermal-Printer-in-Android, but it only accepts image up to 255x255
Is it a problem with the protocol? Both are compatible with ESC / POS.
Thank you.
Hi Douglas,
DeleteSorry for taking so long, although you won't like my answer.
I suspect that the problem is the printer, not the code (@diegoveloper had a similar issue) since there is no trimming of the image or any other alteration (you can see the screenshot on the blog post is beyond that size).
I'd guess that is either a problem of the implementation of the ESC/POS on it, or that there is some hardware limitation.
Have you tried printing a hardcoded byte array to check how many pixels can you print in one "line"? I mean, without using the code provided, just a basic OP set.
i want to print image through thermal printer by using parallel port how to do plzz..help
ReplyDeleteHi Samaira,
DeleteSorry, I've never tried using Parallel port Java, but the concepts should still be the same (given that your printer accepts ESC/POS codes).
Maybe you can try googling how to work with parallel ports with Java (eg. http://rxtx.qbang.org/wiki/index.php/Main_Page)
Thank you Gustavo for your very helpful & brilliant tutorial. It really helped me a lot, much appreciated.
ReplyDeleteFrom Benedict, Kuala Lumpur, Malaysia
Thanks for you appreciation Benedict :)
DeleteI cant test the source code i downloaded
ReplyDeleteException in thread "main" java.lang.IllegalStateException: Couldn't init usb port
at com.printer.EscPosStrategy$USBJavaxPrintPort.initialize(EscPosStrategy.java:363)
at com.printer.EscPosStrategy.print(EscPosStrategy.java:94)
at com.printer.Main.main(Main.java:22)
Caused by: javax.usb.UsbException: Properties file javax.usb.properties not found.
at javax.usb.UsbHostManager.setupProperties(Unknown Source)
at javax.usb.UsbHostManager.getProperties(Unknown Source)
at javax.usb.UsbHostManager.createUsbServices(Unknown Source)
at javax.usb.UsbHostManager.getUsbServices(Unknown Source)
at com.printer.EscPosStrategy$USBJavaxPrintPort.initialize(EscPosStrategy.java:341)
... 2 more
Hello Moshie, looking at the stack trace seems like the properties file cannot be located (ie: Caused by: javax.usb.UsbException: Properties file javax.usb.properties not found.)
Deleteyes i understand the stack trace error but how do i fix it i created a file javax.usb.properties and added this to the content javax.usb.services = org.usb4java.javax.Services and save same location where all java classes are but still get same error how do i go about it
DeleteThanks sir ive been able to resolve that error but run into this
DeleteException in thread "main" java.lang.IllegalStateException: Didn't find USB printer withidVendor: (1208) and idProduct: (514)
at com.printer.EscPosStrategy$USBJavaxPrintPort.initialize(EscPosStrategy.java:352)
at com.printer.EscPosStrategy.print(EscPosStrategy.java:94)
at com.printer.Main.main(Main.java:22)
help pls
thank you very much, i understand how it works now.
ReplyDeletewith some modifications, I could also print into LX-300 :)
hello,did u find solution ? i am getting wrong size of printed image ,can u help me?
Deletehello,i get a same problem , did u find solution ?
DeleteHi Gustavo,
ReplyDeleteI know it’s old, but this article was still one of the ones that helped me the most in coming up with a Haskell version of this code for my Raspberry Pi “photo booth” project : https://trandi.wordpress.com/2017/11/29/receipts-printer-photo-booth/
So thanks !
Dan
You're very much welcomed. Nice to hear that the thing works in Haskell as well.
DeletePretty cool project! Cheers
THANK YOUUUUUUUU Gustavo,
ReplyDeletereally, 2 weeks to try print a little icon and with your code translated in C# i can now print a big Image.
It is a good jo, i must yet improve my class to add a few methods, but you helped me a lot !!!
A congratulation, because your responded always at all question your are a very nice gentleman !
Best regards !!!
Christophe
PS : even old publication can help today
Can you share your C# code?
DeleteCan you share the c# source code that you are using after converting java to c#?
ReplyDeleteHi Gustavo, first of all, really thanks for you help sharing you code.
ReplyDeleteBut i having a problem i have a android project and made some changes to make this compatible, it is working fine the bitmap but not every time i print the image go wrong and show much caracters.
Well i have some questions, i want to understand the basic why i use this :
INIT_PRINTER
LINE_FEED
SET_LINE_SPACE_24
can you explain what is this parameters? and one last doubt, my image have 255px per 255px what i must put in parameters
public static byte[] SELECT_BIT_IMAGE_MODE_V2 = {0x1B, 0x2A, 33};
to work?
2018, it was google and stack overflow, 4 days without exit, beating a lot of head, doing tests. Horrible manuals of difficult understanding. Thank you very much.
ReplyDeleteFrom Brazil, Paulo
hi,
ReplyDeletewe have 2 inch thermal printer(320 dots per line) .
we are trying to display image of 80*75 pixels(dots) and communicating through UART protocol of MCU.
we are using ESC * n1 n2 data (m = 0) .
320 dots per line but image width is 80 dots.
how to send data through UART to printer and proceed with that?
"Error: Could not find or load main class usb" while running the Main.java fiile in eclipse. Please help!
ReplyDelete"Caused by: javax.usb.UsbClaimException: No interface is claimed" exception is coming
ReplyDeleteIs there any sample data of image in hex command, so that I can send that hex data directly to printer and it prints out. I am using another language where it does only need hex commands to send to my label printer. Please help me with the hex sample data for image printing (like a full response data). Please help!
ReplyDeleteHi i have used your code but i am unable to print the entire image on 58mm thermal printer page.
ReplyDeleteWhen i print the imaeg with mode 33 it is printing 1/4 part of logo and strange characters between second and third part of an image. in additionto size of the logo or image is greater than the page size which is 58mm?
can you please guide me how to resolve it
this was happening with me. the problem was that I was sending decimal data instead of hex in the image dimensions... when the printer ended printing with the wrong dimensions I sent to it, it printed the rest of the image data as normal data and the output was some strange characters.
Deletepublic Bitmap resize(Bitmap bitmap) {
ReplyDelete////// scale image to fix image ratio => 512 / (int) Math.ceil((512*h)/w)
int w = bitmap.getWidth();
int h = bitmap.getHeight();
int dw = 512;
int dh;
if (w < h) {
// dh = 512;
dh = 342;
} else {
dh = (int) Math.ceil((512*h)/w);
}
return Bitmap.createScaledBitmap(bitmap, dw, dh, false);
}
private int[][] getPixels(Bitmap image) {
int width = image.getWidth();
int height = image.getHeight();
int[][] result = new int[height][width];
for (int row = 0; row < height; row++) {
for (int col = 0; col < width; col++) {
result[row][col] = getRGB(image, col, row);
}
}
return result;
}
private int getRGB(Bitmap bmpOriginal, int col, int row) {
// get one pixel color
int pixel = bmpOriginal.getPixel(col, row);
// retrieve color of all channels
int R = Color.red(pixel);
int G = Color.green(pixel);
int B = Color.blue(pixel);
return Color.rgb(R, G, B);
}
private byte[] printImage(int[][] pixels) {
ByteArrayOutputStream printPort = new ByteArrayOutputStream();
try {
//// Set the line spacing at 24 (we'll print 24 dots high)
printPort.write(SET_LINE_SPACE_24);
for (int y = 0; y < pixels.length; y += 24) {
//// when done sending data per line,
//// the printer will resume to normal text printing
printPort.write(SELECT_BIT_IMAGE_MODE);
//// Set nL and nH based on the width of the image
printPort.write(new byte[]{(byte)(pixels[y].length)
, (byte)((pixels[y].length) >> 8)});
for (int x = 0; x < pixels[y].length; x++) {
//// for each stripe, recollect 3 bytes (3 bytes (8bits *3) => 24 bits)
printPort.write(recollectSlice(y, x, pixels));
}
printPort.write(LINE_FEED);
}
//// Set the line spacing back to 42 (default line spacing for normal text printing)
printPort.write(SET_LINE_SPACE_42);
} catch(Exception e) {
e.getStackTrace();
}
return printPort.toByteArray();
}
private byte[] recollectSlice(int y, int x, int[][] img) {
byte[] slices = new byte[] {0, 0, 0};
for (int yy = y, i = 0; yy < y + 24 && i < 3; yy += 8, i++) {
byte slice = 0;
for (int b = 0; b < 8; b++) {
int yyy = yy + b;
if (yyy >= img.length) {
continue;
}
int col = img[yyy][x];
boolean v = shouldPrintColor(col);
slice |= (byte) ((v ? 1 : 0) << (7 - b));
}
slices[i] = slice;
}
return slices;
}
private boolean shouldPrintColor(int col) {
final int threshold = 225; //// 0 (black) - 255 (white)
int a, r, g, b, luminance;
a = (col >> 24) & 0xff;
if (a != 0xff) { //// Ignore transparencies
return false;
}
r = (col >> 16) & 0xff;
g = (col >> 8) & 0xff;
b = col & 0xff;
if (r > threshold && g > threshold && b > threshold) { //// when it is nearly white color
return false;
}
luminance = (int)((r + g + b) / 3); //// (int)(0.299 * r + 0.587 * g + 0.299 * b)
return luminance < threshold;
}
Hello,
ReplyDeleteI try to print a logo on the paper, now i did get the example working. I want to print the logo of 300w on the paper with the attatched code. I have build my binary array with LCD image converter. I got a black bar on top and than characters.
I work with a TTGO (arduino)
Can you help me out?
writeByte(27);
writeByte(42);
writeByte(0); // dot densety
writeByte(44); //
writeByte(1);
// data
for (int i = 0; i < sizeof(digikasPrintLogo)/sizeof(digikasPrintLogo[0]); i++)
{
//Serial.println(digikasPrintLogo[i]);
writeByte(digikasPrintLogo[i]);
}
Man this article was so much helpful. I've been searching manuals and stuff through the web and found nothing that I could understand and so many people with the same doubts as me. the funny thing is that your article was way down in the google results. and I almost ignored the link to your article. but then I felt the urge to click and I got the feeling that I would finding just what I wanted here and voilà!
ReplyDeleteHi, I'm looking for help doing the opposite flow - I have the binary data sent to printer which represents an image (saved in binary file) and I need to extract the bitmap image from this data.
ReplyDeleteAny help would be gratefully accepted/
This looks really interesting, but it looks like the source code has disappeared? I get a 404.
ReplyDeletegreat! you "saved my life " :-) thank you it works perfectly
ReplyDeleteThanks and that i have a swell offer: What Do House Renovations Cost green home renovation
ReplyDeleteHello I came very late. but the code is not downloadable...
ReplyDelete