How to make your own DIY budget gym
 Where there is a will there's a way. With the current COVID-19 situation gyms were closed for several months, so as a lot of other people, I’d to find my way around exercising and keeping in shape.
My particular situation when all this started was that I was resuming my training after a trip to Argentina, which lasted 3 weeks. During that time I did mostly bodyweight exercises following a similar template as Convict Conditioning. When I came back to NL, gyms closed after one session, and after 2 years of hard work I didn’t want to go back to square one. In this article I’ll describe some of DIY projects and exercises that I did during the COVID-19 lockdown, and also share that you can get a decent workout if you're willing to be flexible.
Disclaimer: This article includes DIY equipment, and thus is not meant for heavy duty. You won’t find here the same range as you’ve on a gym either. The resources provided here are meant to be used as guidelines or templates, YMMV. And, I'm NOT a professional on this subject, I'm NOT a physical therapist, personal trainer, physician; nor a carpenter, welder. I'm just a guy that likes to make stuff.
Only bodyweight exercises
Here I continued doing the same template as the one during my trip, mainly influenced by Convict Conditioning. I added some extra weight to Squats by loading a backpack with books. I also followed Buff Dudes HIIT workouts (plus Metallica :horns:). And can't recommend Barbell Medicine enough.
At this particular moment no one knew when gyms were getting opened again, a lot, including me, hoped that it happened sooner than later. But after a few weeks of following this routine, and not getting any sign of going back to normal, I decided to make some DIY projects to add some variety to my workouts. Here is a list of different projects ranging from easier to harder (which also coincides with the time I made them).
DIY Sandbag training
Sand is cheap and readily available, around €1.3 for a bag of 25 kg. You only have to consider where to hold it, maybe an old or cheap backpack (I found some scrap fabric and sew a simple sandbag). You can also get some sandbags on AliExpress way cheaper than Rogue. As of what can you do with it, glad you ask, here are some resources:
- 6 Sandbag Workouts (upper & lower body)
- Top sandbag workouts (burn fat and build muscle FAST)
- HOW TO GET SHREDDED: BEST SANDBAG WORKOUTS
And as one of the videos mention, duct tape is your friend when patching leaks! I definitely recommend incorporating sandbags as simple and cheap way to add weight to your training, and I even may take the sandbag (without the sand) to my next trip to Argentina so I can refill it there and continue my training if a gym is not available but sand is.


DIY Dumbbell training
There are ton of resources on dumbbell-only workouts (eg. Beginner's Full Body DUMBBELL WORKOUT), which are pretty easy to make:
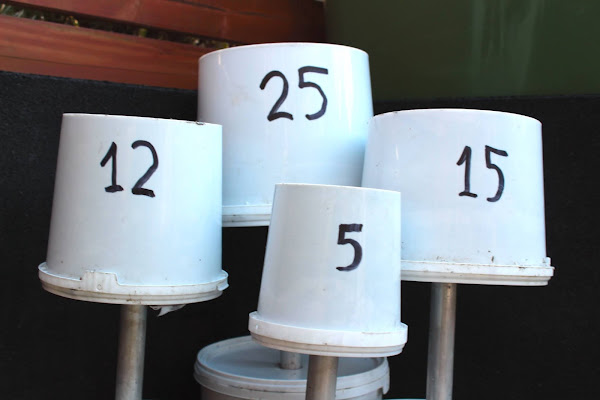
You can get plastic buckets with different litre capacity, by using concrete you get around 2.5 kg per litre (more on this later). So let’s say you want a 15 kg dumbbell, all you need is a couple of 3 litre buckets.
Shopping list (buckets from Manutan.nl, and pipes and concrete from Praxis.nl):
- 4x 1 litre bucket: € 6.60
- 4x 2.5 litre bucket: € 10.60
- 4x 3 litre bucket: € 8.40
- 4x 5 litre bucket: € 14.60
- 3x concrete bags: € 8
- 4x metalic pipes: € 24
- Total: € 72.2
With this we get a pair of 5, 12.5, 15 and 25 kg dumbbells.


DIY Barbell Training
I wanted to go back as soon as possible to my old routine but was missing four things: a barbell, a rack, a bench, and some weights.
Barbell
If you have the resources and time, you may be interested in How to Make a Homemade BARBELL | DIY Duke. If you find this too complicated, the next thing is to make an Axle bar. This kind of bars can be made of electrical tubing, or in my case Scaffolding pipes. Try to look for a shop that will cut the pipe in size you want, (i.e. a standard barbell is 2200 mm in length). For couplings, to avoid weight from sliding in or out you can use this. Things to consider, inner wall thickness (the more the better, will make the bar capable of handling more weight) and total diameter (I chose the closest to, but no larger than, 50 mm, since this is the standard collar opening for regular weights).


Shopping list:
- Axle Barbell 2200mm: € 16.72
- 2x couplings: € 15.25
- Total (ex. shipping): € 32
There are some disadvantages with this barbell:
- Grip: this bar is thicker and doesn’t have knurling some movements are harder than the regular barbell. And another is comfort,
- Weight and maximum capacity: since this bar is made out of tubing the total weight won’t be the same weight as regular barbell (ie. 20 kg), and its maximum capacity will be much lower.
- Ergonomic: squatting with this bar felt somewhat different, for example.
These are things that can be worked around, eg. use mixed grip when doing deadlifts, or working with different leverages to increase the effort required to move the weight (eg. paused squats, deficit deadlifts), or get used to having a thicker barbell on your back.
Rack and bench
Here we’ve different rack and bench variations depending on the resources and time you have at hand, options are broader than the previous case.
- How to Build a HOME HALF RACK (Move It Anywhere!) - DIY Duke
- How to Build a HOME POWER RACK - DIY Dudes
- DIY Folding Squat Rack | Quarantine Build
- How To: DIY Squat Rack & Bench Press Rack for $50


In my case I followed DIY Duke’s video, doing some adaptations and using mostly scrap wood. Around this time my wife gifted my a circular saw, making the whole project easier. It’s possible to make them with a regular hand saw, but the finishing touches wouldn’t be the same.
Weights
And once again, you have some options depending on the resources and time you have at hand. Concrete is cheap.
- How to Make Homemade Gym Weight Plates from CONCRETE | DIY Duke
- How To: DIY Concrete Weight Plates That Don't Break
- Homemade Concrete Barbell - DIY Weights


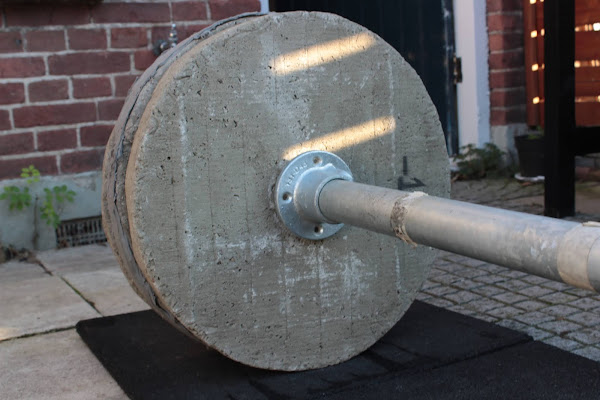
Now, these videos may be too fancy for a DIY project and some part of them may be out of your reach. In my case I didn’t use any of their containers, I just used simple cardboard, yes you read right, cardboard. It’s easy to assemble and shape in the form of a plate. I did two pairs of 20 kg, and a pair of 10, 5 and 2.5 kg. Calculating the shape of the mould is pretty simple:
- 1 litre of concrete ~ 2.5kg
- Volume of cylinder is: V= π r 2h (where r is radius, and h is height)
I wanted to have plates that felt similar to regular gym plates (specially for deadlifts), which have 450 mm on average in diameter. For a 20 kg plate, this gives us 8 litres of concrete, which with a radius of 225 mm, makes for a height of approximately 57 mm (which is also similar to the height of some bumper plates!). As for collar openings, during the concrete pour I used 50mm plastic PVC tubes to ensure no mix would get in the middle of the plate. The reason why I chose a scaffolding pipe with a diameter closest to 50mm, and with the same size on the weights' hole, was that if I ever wanted to buy an actual barbell, I could reuse these weights without having to buy new ones.
One last point that I would like to cover is the uniformity of the weights, we’re used to having the same weight on each side of the barbell. With DIY plates this will be more complicated since it will depend on: how much concrete are you pouring in the mould, what’s your concrete/water mix ratio, etc. But overall don’t worry too much about it.


Pretty good post. I just stumbled upon your blog and wanted to say that I have really enjoyed reading your blog posts. Any way I'll be subscribing to your feed and I hope you post again soon. Big thanks for the useful info. Weightlifting Equipment
ReplyDeleteThanks for a very interesting blog. What else may I get that kind of info written in such a perfect approach? I’ve a undertaking that I am simply now operating on, and I have been at the look out for such info. Online resistance bands
ReplyDeleteThank you because you have been willing to share information with us. we will always appreciate all you have done here because I know you are very concerned with our. live long supplements
ReplyDeleteI admire this article for the well-researched content and excellent wording. I got so involved in this material that I couldn’t stop reading. I am impressed with your work and skill. Thank you so much. personal trainer naples
ReplyDelete